This Tuesday I have an interactive card stock toy for you to learn how to make. Once completed it bends over and over on itself. These are known as Kaliedocycles or Tetra Hexa Flexagons. I learnt how to do this from my daughter Melissa who was taught the how too in a maths lesson many years ago. They are fun for children to play with.
SUPPLIES
- A4 piece of card stock or larger
- Pencil. rubber, ruler, craft knife, craft mat, bone folder, glue and rubber.
- Images or decorating medium of your choice. I have decorated my sample with Twinkling H2O's and stamps. You can use photos if you want.
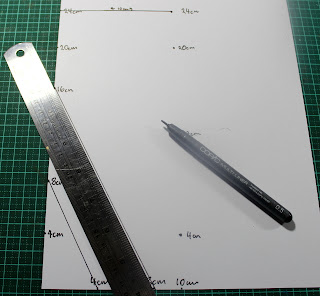
1) Place A4 card stock in portrait position so long edges at the side. Measure from the bottom left up and mark a pencil dot at 4cm intervals till you reach 24cms in length. I'm using a black marker so you can see what I am doing clearly. From bottom left measure across and mark pencil dots at 4cm, 8cm and 10cm.
2) From the 24cm marked dot measure across and mark a pencil dot at 10cm. Measure up 24cm from bottom 10cm mark to the top 10cm mark and adjust that 10cm dot as needed so its at the 24cm mark..
3)Place ruler along both 10cm dots and mark pencil dots up from bottom at 4cm, 12cm and 20cm.
4) Use ruler and pencil and lightly mark diagonal lines from bottom 4cm mark to 8cm mark at left side, 8cm mark at bottom to 16cm dot at left, 4cm mark at right to 24cm mark at left, 12cm mark at right to 4cm point at top line and lastly from 20cm mark at right to 8cm point on top line.
5) Use ruler and mark the diagonals in opposite direction from 8cm mark at bottom to 4cm mark at right. from 4cm mark at bottom to 12cm point at right, from bottom left corner to 20cm mark at right, from 8cm mark at left to 8cm point on top line and lastly from 16cm mark at left to 4cm point on top line. It should look like the picture below.
These shaded areas will be where you apply glue
6) Use ruler and pencil and lightly mark a straight lines from left marks to the ones at the right side
9) Apply glue to the tabs at side and top
10 Fold the tab in from long side and adhere it to the opposite side under the diamond. Continue till you make a diamond snake with the tabs at end.
11) Fold that around to make a six sided shape and pop the remaining glued tabs into the opening at the other end. As an extra precaution I use a stronger glue on these last tabs and leave it adhered in place with a paper clip for a few hours to ensure a strong bond.
Here is a little video of how this is moved when completed.
Enjoy
hugs
Annette In Oz


4 comments:
Unflippinreal! That is pretty cool Annette, but, it looks very time consuming.
You find the coolest things! Will definitely give this a go xx
very cool (and a lot of work lol)
Thanks Robin, Sharon and Bevlea. I have a lot of these sort of how toos as they were around when my kids were young so I used to make them for them Sharon. Wait till I get to the Cathy Daulman section LOL. Its really easy to make this folks just measure carefully.
hugs
Annette
Post a Comment